How to Clean Vornado Tower Fan Without Becoming a Dust Bunny Yourself
Ever wondered why your Vornado tower fan suddenly starts purring—or maybe grumbling—at you? Dust and dirt love sneaking into tower fans, even the fancy Vornado ones.
A quick cleaning can make your fan feel brand new and keep it blowing strong all summer long.
Cleaning your tower fan isn’t rocket science. You just need the right steps so nothing gets damaged.
With a vacuum, a cloth, and a little patience (plus a dramatic sigh or two), you can get your fan spinning quietly again. Weird smells? Gone. Dust bunnies? Evicted.
If you want your Vornado to last and look good, learning to clean it is a must. Your fan may not thank you out loud, but trust me, it’ll run happier (and quieter) when it’s dust-free.
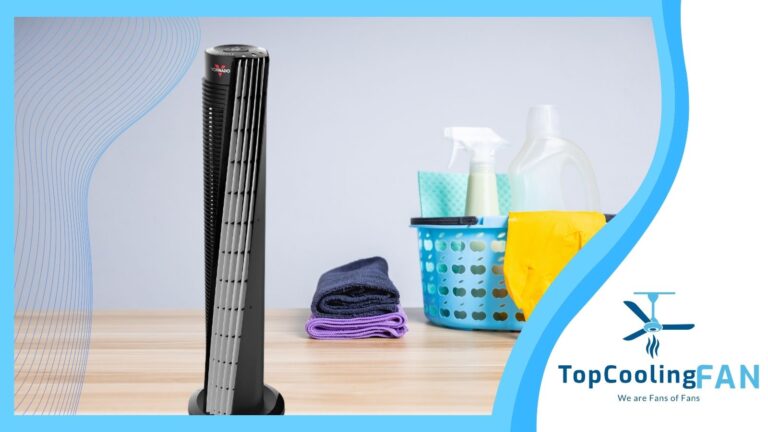
Gathering Your Cleaning Supplies
Before you start, make sure you’ve got everything you need. The right tools and a little elbow grease will help you get your Vornado tower fan looking and working like new.
Essential Tools
First up, you’ll need items you probably already have at home. Use a household vacuum cleaner with a brush attachment to suck up dust from the intake and output vents.
Your dust bunnies don’t stand a chance. A soft, clean cloth is key for wiping down surfaces—microfiber is best, but any soft rag will do.
Dampen it with a bit of water. Don’t drench it, unless you want your fan to become a tiny indoor water park.
For tight spots, grab a cotton swab or an old toothbrush. These little heroes reach between the grates and tackle stubborn dirt like pros.
If your fan needs extra cleaning power, mix a little mild soap or white vinegar with water for your cloth or cotton swab. Here’s a checklist to make grabbing supplies even easier:
| Item | Use |
|---|---|
| Vacuum (with brush head) | Dust removal from vents and grates |
| Soft cloth | Wiping surfaces |
| Cotton swabs / Toothbrush | Cleaning in-between the grates |
| Mild soap / Vinegar | Extra cleaning for stubborn spots |
Optional Gadgets for Extra Shine
Want to make your cleaning job a little more high-tech? Try a can of compressed air. You can blast away dust from tricky corners and out-of-reach places.
A small handheld vacuum can be helpful if your regular vacuum feels too bulky to maneuver around the fan. The more portable, the better—think lightweight, not gym workout.
If you’re feeling fancy, grab a mini duster or an electronics cleaning brush. These tools can speed up the process and look cool in your cleaning arsenal.
They’re not essential, but they might impress your family or roommates with your commitment to dust-free living. Your goal is a fan that doesn’t blow dust bunnies across the room.
Unplug and Prepare Your Vornado Tower Fan
Before diving into the cleaning adventure, get your Vornado tower fan ready. Simple steps like unplugging and finding important parts keep you from starring in your own home improvement blooper reel.
Safety Precautions
First rule: unplug that fan! Reach behind your Vornado—yes, even if it’s ETL listed and looks harmless in the corner.
Powering off and removing the plug means you won’t accidentally recreate a science experiment with the dust bunnies. Make sure your hands are dry.
If your fan came with a remote control, put it somewhere safe (not in the sink, please). Remove any jewelry or loose clothing that might get caught.
Here’s a quick safety checklist:
| Step | Why it Matters |
|---|---|
| Unplug the fan | Don’t get shocked like a cartoon character |
| Dry your hands | Wet hands + electricity = bad combo |
| Remove tripping stuff | Avoid accidental falls |
Proper prep keeps both you and your fan safe.
Locating Key Fan Parts
Time to play “find the parts!” Your Vornado tower fan isn’t as complicated as it looks. Start by looking for the intake and output vents—these are where most of the dust hides.
Check near the base for the power cord. Spot the control panel, which should also house your remote control if your model has one.
Some fans have filters or grills you can carefully remove. If you see any “do not remove” stickers, take them seriously (unlike those on a banana).
For older or unfamiliar models, check the Vornado user manual for a labeled diagram. A flashlight can help you see dust deep inside the vents.
Don’t forget to look for the serial number sticker—sometimes hidden on the back or base—if you need to prove your fan’s identity in a “fan lineup.”
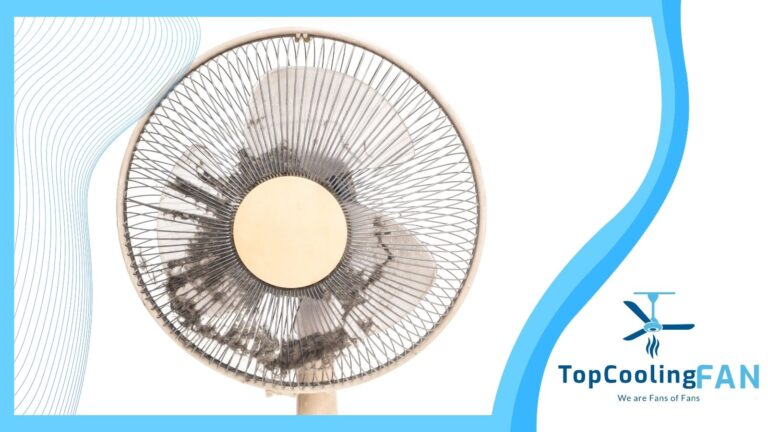
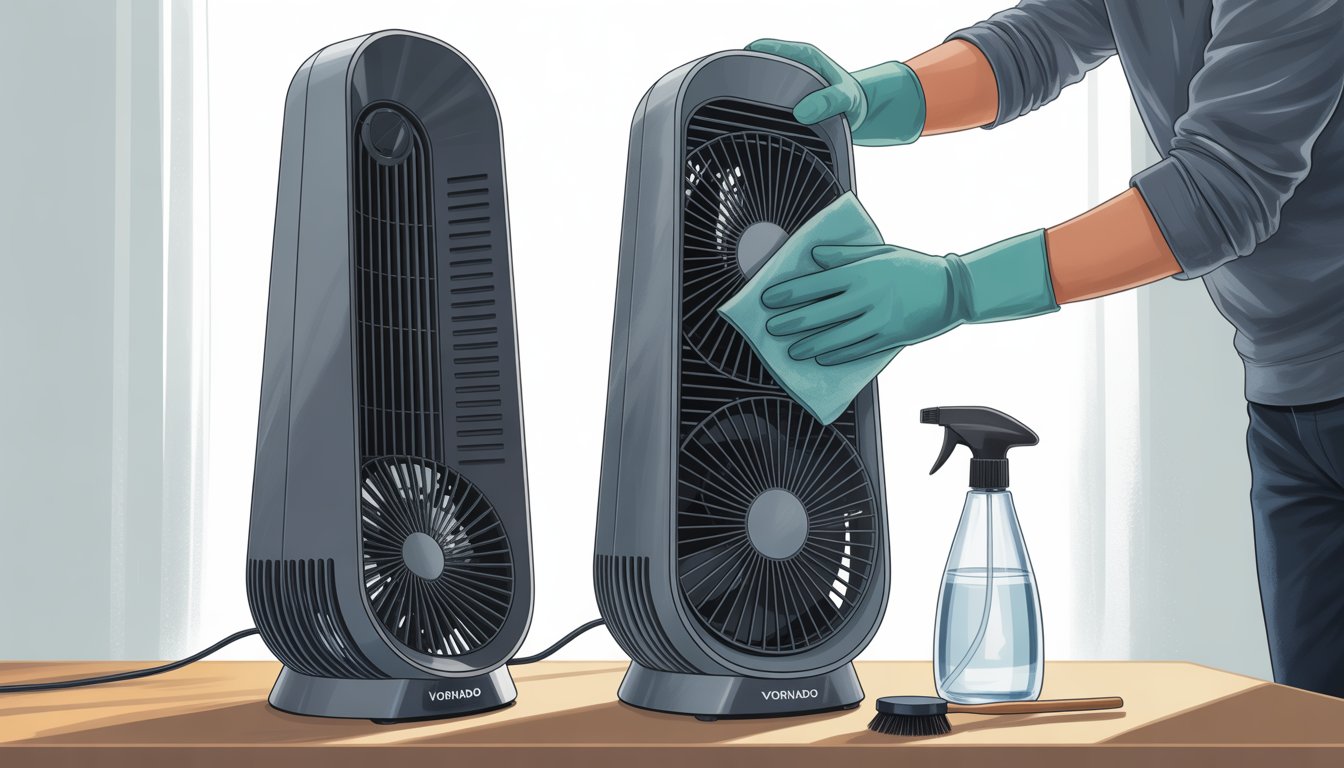
Removing Dust and Debris
Vornado tower fans love to grab dust more than socks attract static on laundry day. If you want your fan working well and want to avoid sneezing fits, pay special attention to the dust hiding in plain sight.
Using the right cleaning tricks and just a little elbow grease, you’ll get your fan looking and working like new again.
Cleaning the Front Angled Outlet Grill
The front angled outlet grill sends that wonderful breeze your way, but it also catches the brunt of dust in your home. Before you start, unplug your fan—zaps are only funny in cartoons.
Use a soft brush or a dry microfiber cloth to gently sweep off loose dust. Don’t poke anything sharp through the grill, unless you want your fan to take early retirement.
If you notice stubborn grime, grab a damp cloth (not dripping wet—your fan isn’t thirsty). Lightly wipe the surface area.
For deep cleaning, you can visit this handy step-by-step Vornado cleaning guide and see how a little patience brings a lot of sparkle. Make sure all parts are dry before plugging the fan back in.
Addressing the Side Inlet Grill
The side inlet grill is where sneaky dust likes to hide out. Use the brush attachment on your household vacuum cleaner to suck out the worst offenders.
Run the brush over the vents on both sides to catch hidden dust bunnies. If you see lots of accumulated dust, take a dry toothbrush and gently scrub in between the slats.
This helps break up sticky sections so your vacuum can do its job. You might get a little cloud of dust, so don’t breathe too deeply—remember, you’re not auditioning for a vacuum commercial.
For especially stubborn areas, a cotton swab can reach into confined spaces. Just make sure not to push debris further inside.
Persistence wins the clean fan race.
Vacuuming the Fan Body
Once those tricky grills are tackled, don’t forget the rest of the fan body. Wipe down the outside with a soft, damp cloth to remove fingerprints, smudges, and any left-behind dust.
Now use your household vacuum’s brush or crevice tool to cover all remaining surfaces—front, back, sides, and even the base. Pay special attention to air vents, since dust loves to camp there.
If you’ve recently cleaned your vacuum, you’ll notice it picks up more dust in less time. Be sure the fan is completely dry before using it again.
For more detailed steps, see tips on using a vacuum for Vornado fans.
Deep Cleaning the Tower Circulator
A Vornado tower circulator can act like a vacuum for dust bunnies if you don’t keep it clean. If you want that superior circulation power and fresh high volume airflow, you’ll need to go beyond a simple wipe-down.
Disassembling for a Thorough Wash
First things first: unplug your fan. Shocking yourself is the opposite of a fun cleaning day.
Grab a screwdriver—usually Phillips works best—and look for screws at the back or bottom of the unit. Some Vornado fans have slots where you can slide the cover off after removing screws, which feels very “secret agent meets home cleaning.”
Don’t force anything; if it’s stuck, there’s probably a hidden screw out to ruin your day. Once open, marvel at all the dust you haven’t been breathing in—yikes.
Make a parts table beforehand, so you don’t lose screws:
| Part | Location | Notes |
|---|---|---|
| Screws | Back/Bottom | Put in dish |
| Cover | Front or Side | Wipe Dusty Side |
| Air Intake Grill | Usually at Back | Gets Dirtiest |
Handle each part gently, especially plastic pieces that snap together. If you’re the forgetful type, snap a photo with your phone so you can put it all back together later without feeling like you’ve built a time machine instead of a fan.
Wiping Down Internal Components
For serious airflow, skip the leaf blower. Use a vacuum brush or even a makeup brush to clear out the fine dust hiding in every groove and vent slot.
You can grab a damp towel for dirt, but don’t soak any electrical parts. Water and tower circulators are sworn enemies.
Got stubborn grime? Try a little dish soap or vinegar mixed with water—just wring your cloth out well. Focus on the blade drum or vertical blades; even a thin layer of dust blocks airflow and turns your fancy fan into a sculpture.
Let every part dry completely before you even think about putting things back together. Trust me, nobody wants a “shock and awe” moment when plugging in a wet fan.
Once dry, reassemble your fan. Give yourself a nod for braving the dusty depths. If you want extra help, check out this guide on removing the cover for cleaning.
Reassembling and Final Touches
Now that your Vornado tower fan is sparkling, it’s time to put the puzzle back together. A proper reassembly means the fan works as it should, keeps you cool, and doesn’t rattle like a maraca.
Don’t forget to check that all the cool features—remote control, oscillation, and whatever else—are set up and ready.
Double Checking Before Use
Before you unleash your newly cleaned Vornado, double-check your work. Make sure every panel, screw, and vent cover is back in place.
If your fan is ETL listed, you can relax knowing you didn’t just invent a new fire hazard.
Reconnect any wires or plugs you detached earlier. Nobody wants a fan that hums but refuses to spin.
Gently press or wiggle the fan—if anything feels loose, tighten up the screws, but don’t go full Hulk.
Grab your remote (hopefully not sticky) and test if the fan powers on from across the room. Turn on the oscillation and watch it wave back and forth like it’s greeting you.
| What to check | Why it matters |
|---|---|
| Panels secure | For safe operation |
| Screws tight | Reduces vibration |
| Blades in place | Ensures airflow |
| Cords connected | Powers the fan |
Restoring Remote Control Functions
The remote is your ticket to lazy comfort, but after cleaning, you need to make sure it’s still working. Check the battery—if your Vornado uses a 3V CR2032 battery, pop it out and back in or swap it for a new one if the remote’s acting stubborn.
Wipe the remote with a dry, soft cloth. Don’t use water or spray—electronics hate swimming.
Stand a few steps back and try all the buttons. If nothing works, blink twice, swap in fresh batteries, and try again.
If your fan still ignores you, check the sensor window on both the remote and the fan for dust, fingerprints, or whatever mystery gunk collects there.
Tip: Keep the remote somewhere visible and safe. Losing it means you’re on a living room scavenger hunt next time you want a breeze.
Maintaining Efficient Cooling and Airflow
Keeping your Vornado tower fan running strong takes more than a quick wipe-down. Powerful circulation and smart airflow settings can really help your comfort and maybe even your electric bill.
Optimizing Powerful Circulation
If your tower fan’s airflow feels weak, it’s probably time for a clean. Dust bunnies love vents, grids, and blades—don’t let them win.
Use a damp cloth and a vacuum with a brush attachment once a week. That’s usually enough to keep things clear.
Set your fan at least a foot away from walls or big furniture. It needs space to pull in air and push out a breeze.
Cramped corners? Not ideal. Give your fan room to do its thing.
Pay attention to the base. Vornado’s guide says to wipe the base with a damp cloth for safety and efficiency. If airflow drops, check underneath for hidden dust parties.
Check out Vornado’s tower fan cleaning instructions for more details.
And please, don’t block the airflow with laundry baskets or piles of stuff. For quiet operation, make sure nothing vibrates against the fan while it runs. Nobody wants rattling during movie night.
Adjusting Airflow Settings
Your Vornado isn’t just one speed. Switch it up! Use the different airflow settings to match your mood or the weather.
Low is perfect for quiet study time. High? That’s for when you want the room to feel like a wind tunnel (without the cows, hopefully).
It’s tempting to blast the fan on high all day, but that’s not always best for efficiency. Balance airflow and energy use by sticking to moderate most of the time, then crank it when you need a quick cool-down.
Want the breeze aimed right at you? Adjust the angle and oscillation features. Tilt the top for head-to-toe airflow. Play with it—you’ll find your sweet spot.
Hear weird noises or feel uneven air? Double-check your settings and give the fan a quick clean. Dust-free controls mean each button works like new.
Tips for Long-Term Care of Your Vornado Tower Fan
Good care keeps your Vornado’s circulation power strong and your home cooler with less effort. Smart cleaning and proper storage can save you from dust battles and help your fan last for years.
Regular Cleaning Schedules
Dust loves a Vornado as much as you do. But if it gets too comfy, your fan loses its charm—and its superpowers.
Stick to a routine. Once a month, use a vacuum with a brush attachment on the intake and output vents. A soft cloth or a makeup brush works for the outside too.
This keeps dust from sneaking inside and clogging things up. Weekly, check for big clumps or pet hair around the base. Scrub lightly with a damp cloth if needed, but don’t dunk your fan in water unless you’re looking for a disaster.
Tip: Unplug your fan before cleaning. Your fingers will thank you.
More cleaning tips are in Vornado’s fan care recommendations and from other fan owners who’ve been there.
Storing the Fan Off-Season
When summer fades and your fan sits unused, it’s time for storage. Give your Vornado a final clean and dry wipe-down first.
- Remove all dust and debris.
- Check the vents for blockages.
- Wrap the cord loosely to avoid kinks—no wrestling moves.
Store the fan upright in a dry, cool closet or basement corner. Don’t leave it outside unless you think it needs a vacation.
Keep it away from spots where it might collect dust or get knocked over by pets or kids. If you have the original box, use it. If not, a clean garbage bag or cloth cover works to keep out dust.
Next season, your fan will be ready to tackle the heat—no marathon cleaning session required.
Frequently Asked Questions
Cleaning your Vornado tower fan can feel tricky, but it’s just about the right tools, some patience, and a bit of humor. You don’t need magic or an engineering degree to keep your fan running better and longer.
What’s the magic spell to open up a Vornado fan for a good ol’ scrub?
No secret spell needed. Grab a screwdriver and look for visible screws—usually on the back or top. Remove them and the grill should come loose for easy cleaning.
Do I need a degree in Mechanical Engineering to disassemble my Vornado tower fan?
Nope, no diploma required. Most models just need a standard screwdriver and a little patience. If you can handle IKEA furniture, you’re more than qualified.
Can I just ask my Vornado fan nicely to clean itself?
You can try, but unless you have a voice-activated, self-cleaning fan (you don’t), you’ll need to do the work. If talking to appliances worked, chores would be history.
What’s the secret handshake for removing the grill from a Vornado fan?
Forget handshakes—just unscrew the screws holding the grill. Some have two screws at the back or sides. Remove them, lift the grill off, and maybe wiggle it a bit. No dance moves required. For more steps, check this guide on removing the grill.
Is it true that a Vornado fan filter holds more dust than my vacuum cleaner?
If you clean your vacuum, probably not. But Vornado fans do collect a ton of dust, especially around the vents. Give them a regular once-over with a vacuum brush or soft cloth to avoid growing your own dust bunnies. More on dust collection at Vornado tower fans.
How often should I give my Vornado fan a bath without electrocuting myself?
Try to clean your fan every couple of weeks, especially if you use it a lot. Always unplug your fan first—trust me, you want to avoid that hair-raising experience.
Give it a quick dusting once a week. Your fan will run better, and honestly, you’ll probably feel better too.
If you’re curious, you can find more advice in these cleaning tips.